You will most commonly use LSF JobScheduler to process periodic or repetitive jobs. To accomplish this, you need to first select or create a calendar. Next you must associate jobs with the calendar. Once you have performed these two tasks, LSF JobScheduler will automatically execute your jobs according to the calendar schedule and the resource requirements of your jobs.
You can also use LSF JobScheduler to process jobs based on the occurrence of some other events in the system, e.g. the creation (arrival) of a file.
LSF JobScheduler offers many utilities to check the status and progress of your jobs and calendars. You can set up alarms and exception handlers to handle job failure. Other utilities allow you to discover the resources available in the clusters on the network.
This chapter walks you through some of the most common LSF JobScheduler operations.
LSF JobScheduler enables you to submit and monitor your mission critical jobs in a heterogeneous network environment. It automatically balances the load on the hosts in your cluster so that your jobs run faster. Tools are provided to allow you to view your cluster resource and load information from any machine in your cluster. LSF JobScheduler gathers cluster resource information as well as system state information from all server hosts in the cluster. A variety of utilities are available to present such information in various formats.
Job queues represent different job scheduling and resource allocation services. All jobs submitted to a queue share the same policy. Each queue can be configured to use a subset of the servers in the LSF JobScheduler cluster.
The bqueues command lists the available queues.
% bqueues
QUEUE_NAME   PRIO   STATUS          NJOBS   PEND   RUN   SUSP
nightly      43     Open:Inactive   5       5      0     0
accounting   30     Open:Active     0       0      0     0
evaluation   20     Open:Active     0       0      0     0
The lsload command displays dynamic load information about LSF JobScheduler server hosts.
% lsload
HOST_NAME   status  r15s  r1m r15m  ut    pg  ls it  tmp  swp   mem
hostd       ok      0.4   0.3 0.1   14%   10  5  3   56M  203M  125M
hostb       ok      0.8   0.8 1.6   42%   7   4  0   10M  71M   43M
hosta       unavail
The hosts are ordered so that lightly loaded hosts are listed first. The status `unavail' indicates that the Load Information Manager (LIM) on that host is not running.
The lshosts command shows the static resource information about LSF JobScheduler server hosts.
% lshosts
HOST_NAME  type   model   cpuf ncpus maxmem maxswp  server  RESOURCES
hosta      hppa   HP715   4    1     64M    128M    Yes     (hppa hpux)
hostb      sunsol sparc   3    1     96M    128M    Yes     (sun solaris)
hostd      SGI    R10000  10   8     512M   1024M   Yes     (sgi irix6)
Static resource information is either configured by your LSF administrator or automatically identified by LIM.
The bhosts command displays information about LSF JobScheduler server hosts information.
% bhosts
HOST_NAME          STATUS    JL/U  MAX  NJOBS  RUN  SSUSP USUSP  RSV
hosta              ok        -     1    0      0    0     0      0
hostb              closed    -     1    1      1    0     0      0
hostd              ok        -     4    2      2    0     0      0
These fields display the status and job counters on the LSF JobScheduler servers. The status `closed' indicates that the server will not accept any new jobs at the current time.
To submit a job into LSF JobScheduler, use the bsub command or the xbsub graphical tool. If you submit a job that has no dependency conditions (such as time events and file events), then the job will be run once, at most, and will be removed from LSF JobScheduler after it finishes.
For example, you can submit the job "sleep_30" from the command line as follows:
% bsub sleep_30Job <1234> is submitted to default queue <normal>.
Here, 1234 is the job ID assigned by LSF JobScheduler, and normal is the name of the default job queue defined by your LSF cluster administrator. There are a number of options you can specify to control the way in which your job should be scheduled.
See Section 5, `Defining Jobs', beginning on page 59, for more information on controlling the scheduling of your job.
There are two possible types of calendars you can use to submit your job: a preconfigured system calendar, or a calendar you or another user created. See `What is a Calendar?' on page 31 for more details.
The following example shows you how to create a calendar with the bcadd command.
% bcadd -d "Every Monday" -t "*:*:Monday" on_monday
Calendar <on_monday> is created.
This creates a calendar named `on_monday' that is active every Monday. A calendar has a name, a calendar expression, and an optional description. The calendar name is case insensitive.
The optional description is a string of text declared with the -d option. If the string contains blanks or special characters, the entire string should be placed within quotes. This description string is displayed as part of the calendar information when you run bcal command with `-l' option.
% bcal -l
CALENDAR: on_monday
	  -- Every Monday

OWNER  STATUS    CREATION_TIME              LAST_MODIFY_TIME
user1  inactive  Fri Nov 14 17:50:01 1997   -

CAL_EXPRESSION:  *:*:Monday
LAST_CAL_DAY: <Mon Nov 10 1997>
NEXT_CAL_DAY: <Mon Nov 17 1997>
A calendar expression defines the days during which the calendar is active. To prevent a command line interpreter, such as a shell in UNIX, from interpreting any special characters, the calendar expression following the -t option of bcadd should be placed within quotes. See `Command Line Interface for Defining Calendars' on page 39 for further details.
Once your calendar is created, it can be used to drive jobs. A calendar can also be modified using bcmod command or the xbcal GUI.
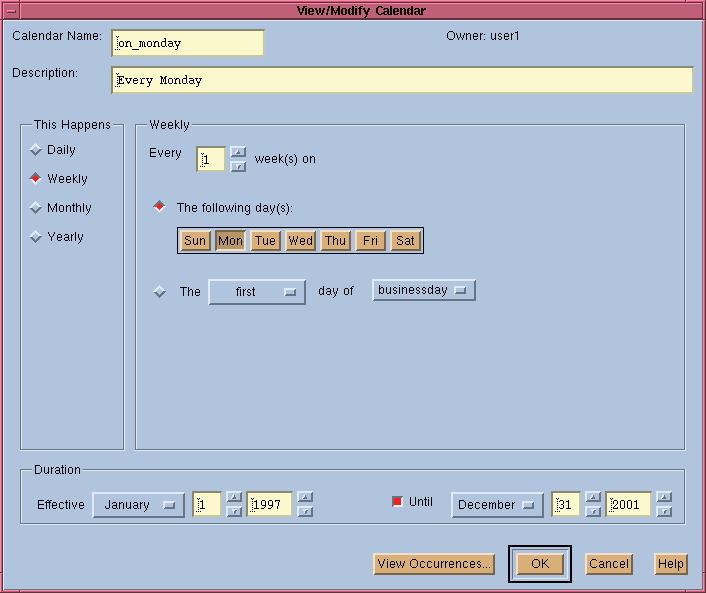
Although you can create calendars from the command line, it is more convenient to use the LSF JobScheduler - Calendar graphical application to do it. Figure 2 shows the calendar creation window of the xbcal GUI tool.
Figure 2. xbcal Calendar Creation Window

LSF JobScheduler gives you two ways to display calendars--using the bcal command from a command-line prompt, or using the xbcal graphical tool.
The bcal command displays information about the calendars in the system.
% bcal
CALENDAR_NAME  OWNER  STATUS    LAST_CAL_DAY     NEXT_CAL_DAY
on_monday      user1  inactive  Mon Nov 10 1997  Mon Nov 17	  1997
workdays       sys    active    Wed Nov 12 1997  Thu Nov 13 1997
By default, bcal displays all of your calendars, and all system-defined calendars. You can specify a calendar by name.
% bcal on_monday
CALENDAR_NAME  OWNER  STATUS    LAST_CAL_DAY     NEXT_CAL_DAY
on_monday      user1  inactive  Mon Nov 10 1997  Mon Nov 17	  1997
See `Manipulating Calendars Using the Command Line Interface' on page 40 for details of the individual fields of the bcal output.
The same information is available using the LSF JobScheduler - Calendar graphical application xbcal. In Figure 3, xbcal has been used to display all the calendars on the system.
Figure 3. xbcal Calendar List Window

LSF JobScheduler gives you two ways to associate jobs with calendars--using the bsub command from a command-line prompt, or using the xbsub graphical tool.
Once you have created your calendar, you can associate jobs with it. Submit a calendar-driven job using the bsub command. The -T option defines a calendar-dependent job by specifying the active time within a calendar.
% bsub -T "on_monday:01:00" myjob
Job <3456> is submitted to default queue <normal>.
This calendar-driven job will be executed each Monday at 1:00 am.
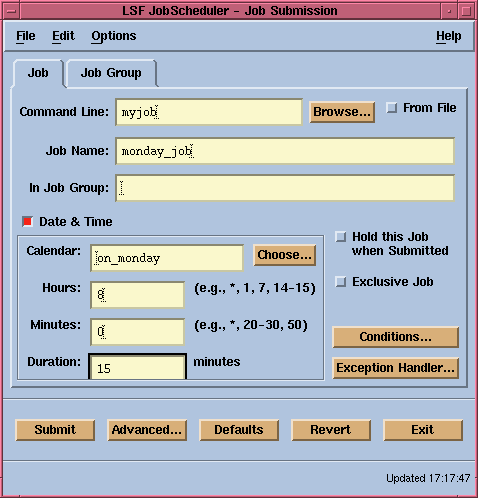
You can use the GUI application xbsub to associate jobs with your calendar. Figure 4 shows submitting a job to the calendar `on_monday'.

Use the bdel command to remove a job.
% bdel 3456Job <3456> is being deleted
This command removes a specific job from the system. If the job is currently running, bdel kills the job before removing the job from the system. You can also delete a job using the LSF JobScheduler GUI by selecting on the job from the xlsjs main window and clicking "Delete a Job".
You can make a job depend on one or more prior jobs. For example, your job may require that the previous job has started processing (but it does not matter if it has completed).
% bsub -w "started(first_job)" -J second_job time_card
In normal processing, your job probably requires that the prior job finished successfully.
% bsub -w "done(pre_process)" -J main_process cheque_run
Such operations can also be easily done using JobScheduler's submission GUI. See `Inter-job Dependencies' on page 83 for information on this graphical tool.
You may want a job to run after some file event has occurred. LSF JobScheduler will check for the file event and run your job. For example,
% bsub -w "file(size(/data/log_file)>40M)" command
This tells LSF JobScheduler to run the job when file "/data/log_file" has grown beyond 40 MB in size.
% bsub -w "file(exist(/data/new_file))" command
This tells LSF JobScheduler to run the job if file "new_file" exists.
The LSF JobScheduler GUI xbsub provides you with an easier way to specify file event dependencies. See `File Event Dependency' on page 86 for all available file event functions, and more examples.
After you have submitted jobs to LSF JobScheduler, you can check the status of your jobs by running the bjobs command.
% bjobs
JOBID USER   STAT   QUEUE      FROM_HOST EXEC_HOST JOB_NAME SUBMIT_TIME
1004  user6  RUN    sim        hosta     hosta     portf1   Sep 1 09:23
1235  user6  PEND   priority   hostb               backup   Sep 1 13:55
1234  user6  SSUSP  sim        hostd     hostb     portf2   Sep 1 10:09
1250  user6  PEND   sim        hosta               forecast Sep 1 13:59
Running jobs are listed first. Pending jobs are listed in the order in which they will be scheduled. Jobs in high priority queues are listed before those in lower priority queues.
The LSF JobScheduler GUI xlsjs provides an easy interface to monitor job status.
All the operations described above can be executed using the LSF JobScheduler GUI suite xlsf.
xbmod - this GUI allows you to modify the attributes of already submitted jobs
xbcal - calendar GUI that allows you to create, remove, and modify calendars
xlsjs - this GUI allows you to do all of the above including monitoring job execution history, schedules, dependencies, and job groups
xbalarms - LSF JobScheduler alarm GUI that allows you to view, acknowledge, and resolve alarms
The online help built into these GUI tools allows you to learn as you work.