A job is a program or a command that is run on a host within an LSF cluster. A job can be a one-time job that is run only once and leaves the system forever, a repetitive job that is run every time the associated dependency conditions are met, or an ad-hoc job that will not run until a user explicitly directs it to.
There are three types of jobs in LSF JobScheduler.
A job is treated as a repetitive job if the job has a dependency condition specified. A job is considered to have a dependency condition if it is associated with an event as described in Section 3, `Events and Calendars', beginning on page 21.
A job is treated as an ad-hoc job if it is not a repetitive job and is submitted with a hold requirement. A job with a hold requirement will be suspended as soon as it is created. It must be explicitly resumed before it is considered for scheduling. After an ad-hoc job finishes, it returns to suspended status for reexecution.
One-time jobs are jobs that are submitted by users for execution as soon as conditions are right, and then removed from LSF JobScheduler memory without further user involvement. A one-time job is executed once only, does not have a dependency condition, and is not submitted with a hold requirement.
Jobs can be grouped into job groups for easy management. A job group is a container for jobs, similar to the way in which a directory is a container for files. Multiple levels of job groups can be defined to form a hierarchical tree. A job group can contain jobs and sub-groups.
A job can have several key attributes:
jobId - a positive integer that uniquely identifies the job.
Every job in the LSF JobScheduler is automatically assigned a job ID, which
is returned by LSF JobScheduler when the job is submitted.
jobName - assigned as an additional identifier
to simplify reference and manipulation. This name does not have to be unique.
If you do not supply a name, the system uses the name of the submitted command
as the jobName.
After the job is submitted, it is placed into a job queue where it waits to be scheduled by LSF JobScheduler. The job will be automatically started by LSF JobScheduler on a suitable machine in the cluster once the specified conditions are met. After the job has finished, the output from the job is delivered to the user, either into a specified file or via email. If it is a repetitive job, it is placed back into the queue where it waits to be scheduled the next time the specified conditions are met.
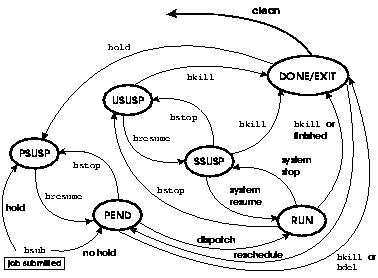
Figure 10 shows the state transitions a job may experience during its life-cycle. LSF JobScheduler maintains and updates the status of each job as it passes into different states. The possible job states are:
bhosts -l command).
When a job is submitted, it is given PEND status by default. If the hold flag is specified for the job when it is submitted, the job will be given PSUSP status. Submitting the job into the PSUSP state prevents it from being scheduled until explicitly requested.

Depending on the nature of the job, a job with DONE
or EXIT status is handled differently. If a job is associated with an event
that is not a time event, the job will go back into the PEND state immediately,
waiting for the event to become active again. If a job is time event dependent,
the job will stay in the DONE or EXIT state for a configured period of CLEAN_PERIOD
(as can be seen by reading the output of the bparams command),
or as soon as the time event becomes active again, whichever happens first.
Then the job will be requeued with PEND status.
If a job is a one-time job, the job will stay in the
DONE or EXIT state for a configured period of CLEAN_PERIOD (as can be seen by
running the bparams command), and then will be removed from LSF
JobScheduler memory.
If a job is submitted with hold flag, the job will go back to the PSUSP state immediately after it finishes.
As can be seen from the state diagram, a repetitive job never leaves the system, unless it is explicitly deleted.
A non-repetitive job submitted with the hold flag will be given PSUSP status when the job is finished. A job with hold status will go into the PEND state only if the user resumes it.
Jobs may also be suspended at any time. A job can be
suspended by its owner, by the LSF administrator, or by LSF JobScheduler. There
are three different states for suspended jobs: PSUSP, USUSP,
and SSUSP.
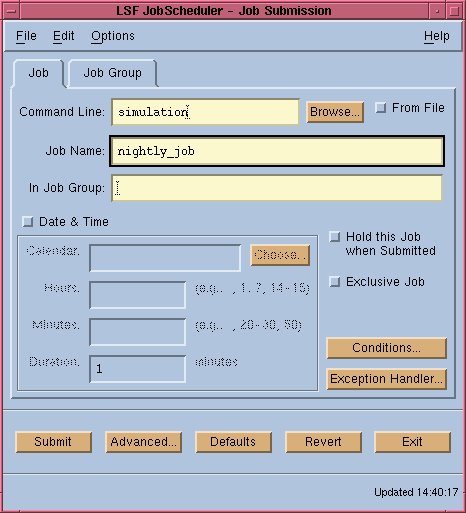
You can use either the LSF JobScheduler GUI or the
bsub command to submit a job to the system. Figure
11 shows the Job Submission window of the LSF JobScheduler xbsub
GUI. All that is required in this window is the actual command line you want
to execute. LSF JobScheduler will find a suitable host to run your job if you
do not specify one.
The same job can be submitted to LSF JobScheduler using
the bsub command:
% bsub -J nightly_job simulation
Job <101> is submitted to the default queue <normal>.
The job_name is a string of text declared
with the -J option. If the string contains blanks or special characters,
it should be placed within quotes. When you submit the job to the system, a
job ID is assigned and displayed. If you do not supply a name, the system uses
a portion of the command name as the default job name.
Figure 11. Job Submission Window
Since this job is not associated with a dependency condition, it is a simple one-time job. To define a repetitive job, associate it with a dependency condition. See `Specifying Dependency Conditions' on page 80 for more information.
When one of your jobs completes or exits, the system
emails you, by default, a job report together with the job's standard output
(stdout) and error output (stderr). The output from
stdout and stderr are merged together in the order
in which they were printed, as if the job had been run interactively.
By default, the
stdinof the job is set to/dev/null.
By default, the
stdinof the job is set toNUL.
If you do not wish to receive email for the stdout
and stderr of your jobs, you can customize this at job submission
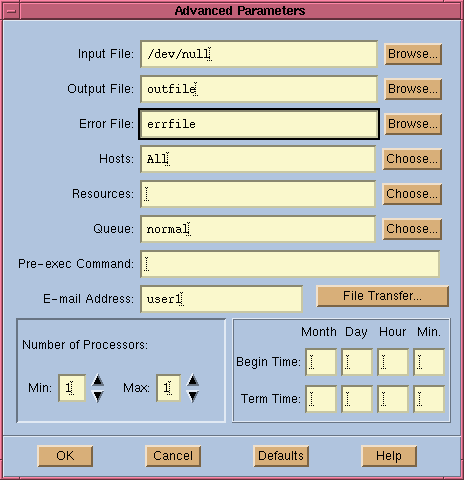
time. Figure 12 shows the GUI interface for
specifying job parameters--standard input and output and error output are the
first three fields in the window. This window is opened by clicking on the "Advanced"
button of the xbsub main window as shown in Figure
11.
If you choose to receive email, you can redirect it to a specified user instead of your current login name.
Figure 12. Job Parameters Window
The same result can be achieved via the bsub
command interface:
% bsub -o outfile -e errfile -u user1 -q normal simulation
Job <102> is submitted to default queue <normal>.
If you specify the -o outfile
argument but do not specify the -e errfile argument,
the standard output and error are merged and stored in outfile.
The output file reported by LSF JobScheduler normally contains job report information as well as job output. This information includes the submitting user and host, the execution host, the CPU time used by the job, and the exit status.
The output files are created on the execution host.
LSF JobScheduler provides you with many ways to restrict the set of candidate hosts on which your jobs may be run.
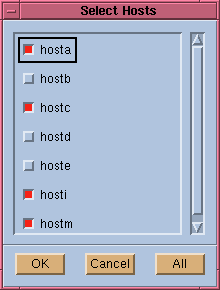
Clicking on the "Choose" button beside the "Hosts"
area (shown in Figure 12), displays a list
of all LSF JobScheduler server hosts on which your job may be run. Figure
13 is an example of a host selection window. Click on "OK"
to finish host seletion. All hosts chosen will be displayed in the "Hosts" field
of the original window (see Figure 12).
The hosts you choose at job submission time are candidate hosts for the job. LSF JobScheduler will use intelligence in determining which host should be used to run the job, depending on the dynamic load situation. If you want to restrict your job to run on one specific host, choose only that host as the candidate host.
Host selection for a job can also be done using the
bsub command line:
% bsub -m "hosta hostb hostc" simulation
Job <103> is submitted to default queue <normal>.
Any host(s) you choose must also satisfy all other scheduling conditions in order to be eligible to run the job.
By specifying more than one host for your job, high availability is achieved automatically, because as long as one of the hosts you specify is up and running, the job will be able to run.
Figure 13. Host Selection Window
If you have a large cluster with many hosts, it can be inconvenient to type in or select the same or a similar set of hosts if you frequently run jobs that are restricted to the same hosts. To make this easier, LSF JobScheduler allows you to put hosts together in host groups, and then select the name of the group you want, rather than each host individually.
A host group is just an alias for a group of hosts
in LSF JobScheduler. To see what host groups are configured by your LSF administrator,
run the bmgroup command. Host group names can be used in any place
that a host name can be supplied as a parameter. For example:
% bsub -m HPservers myjob
Job <104> is submitted to default queue <normal>.
This submits a job that will run on one of the hosts
defined by the host group HPservers.
In some situations, you may want to specify a preference for the hosts chosen, rather than an outright restriction.
For example, you may prefer to run a job on a big server because it is faster. But since that server host may not always be available, you want to specify two other slower hosts as backups in case the big server is not available.
Host preferences can be specified together with hosts chosen. For example:
% bsub -m hosta hostb+1 hostc+2 command
This tells LSF JobScheduler that the job should be
run on hostc if it satisfies the requirements. Otherwise, run it on
hostb. hosta should be used only if neither hostc
nor hostb can run the job. The "+number" following the
host name indicates the preference level of the chosen host.
You can also specify host preferences using the GUI interface.
When more than one queue is available, you need to decide which queue to use. If you submit a job without specifying a queue name, LSF JobScheduler chooses a suitable queue as the default queue.
Use the bparams command to display the
default queue:
% bparams
Default Queues: normal
Job Dispatch Interval:	 20 seconds
Job Checking Interval:	 80 seconds
Job Accepting Interval:	 20 seconds
This command displays LSF JobScheduler parameters configured by your cluster administrator.
You can override the system default by defining the
environment variable LSB_DEFAULTQUEUE. For example:
% setenv LSB_DEFAULTQUEUE priority
The default queue is normally suitable to run most jobs. If you want to submit jobs to queues other than the default queue, you should choose the most suitable queue for each job.
To specify a queue for your job, simply put a queue
name in the "Queue" area of the Job Parameter window (shown in
Figure 12). If you do not know what queues
are available, click on the "Choose" button beside the "Queue" field. This displays
a popup window from which you can select a queue for your job. It is possible
to choose multiple queues for your job, in which case LSF JobScheduler will
automatically find a queue that will be able to handle your job, based on your
job's parameters.
To see detailed queue information, use the bqueues
command or use the LSF JobScheduler xlsjs GUI.
Resource requirements specify the resources required before a job can be scheduled to run on a host. This is especially useful when your cluster consists of machines with different architectures, operating systems, or hardware/software resources. Resource requirement support is a powerful mechanism for resource mapping in LSF JobScheduler. For background information on resource requirements, See Section 4, `Resources', beginning on page 45.
By specifying resource requirements, your job is guaranteed to run on a host with the desired resources. For example, if your job must be run on a host with the Solaris operating system, you can specify this requirement. LSF JobScheduler will consider only Solaris machines as candidate hosts for your job.
With resource requirements specified for your job,
you do not have to specify candidate hosts. You can view your cluster as one
virtual machine with different resources. You specify the resource requirements
for your job; LSF JobScheduler matches your job's resource requirements to actual
resources that are available. For example, if you know your job needs an HPPA
machine and at least 50MB swap space to run, simply include "type==HPPA&&swp>50"
as the job's resource requirement.
You do not have to specify a resource requirement each time you submit a job. Simply put the job's resource requirement in your remote task list so that LSF JobScheduler automatically finds this resource requirement by command name. See `Configuring Resource Requirements' on page 57 for remote task list operations.
By specifying resource requirements explicitly when you submit a job, you override those defined in your remote task list. If your job's resource requirements are not defined in your remote task list, and you do not specify a resource requirement explicitly at job submission time, LSF JobScheduler assumes the default resource requirement. The default resource requirement is that your job be run on a host of the same type as the host from which the job is submitted.
Some jobs require resources that LSF JobScheduler does not directly support. For example, a job may need to successfully create a scratch space before it can run. This pre-execution procedure may or may not succeed, depending on the dynamic situation on the execution host.
A pre-execution command is a job attribute you can
specify so that your job will run on a host only if the pre-execution command
has successfully completed. The pre-execution command returns information to
LSF JobScheduler using its exit status. If the pre-execution command exits with
non-zero status, the main job is not dispatched. The job goes back to the PEND
state and is rescheduled later.
A pre-execution command can be defined in the job parameter
window shown in Figure 12, or you can use
the -E option of the bsub command. The following example
shows a job that requires a tape drive. The program tapecheck is
a site-specific program that exits with a status of 0 if the specified
tape drive is ready, and exits with a status of 1 otherwise.
% bsub -E "tapecheck /dev/rmt0l" backup
A pre-execution command is executed on the same host as the main job. A pre-execution command is run under the same user ID, environment, and home and working directory as the main job. If the pre-execution command is not in your normal execution path, the full path name of the command must be specified.
The standard input, output and error files for the pre-execution command are those of the main job.
The LSF JobScheduler system assumes the pre-execution command can be run many times without having side effects.
An alternative to using the -E option
is for the LSF JobScheduler administrator to set up a queue level pre-execution
command. See "Queue-Level Pre-/Post-Execution Commands" in the LSF JobScheduler
Administrator's Guide for more information.
LSF JobScheduler is normally used in networks with shared file space. When shared file space is not available, LSF JobScheduler can copy needed files to the execution host before running the job, then copy the resultant files back to the submission host after the job completes.
When you click on the "File Transfer" button in the Job Parameter window (shown in Figure 12), you will see a window for specifying file transfer requirements (shown in Figure 14). You can specify multiple files to be transferred, and in different ways.
Figure 14. File Transfer Requirement Window
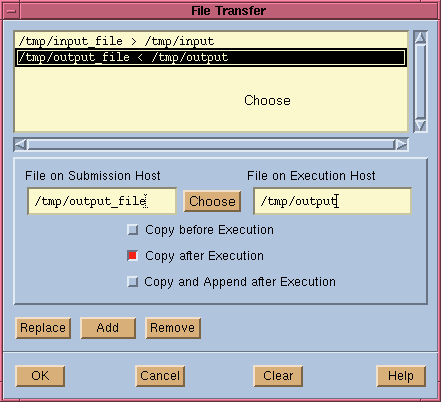
File transfer requirements can also be specified using
the bsub command with the following option:
[lfile op [rfile]]
lfile
This is the file name on the submission host.rfile
This is the file name on the execution host.The
lfileandrfileparameters can be specified with absolute or relative path names. If you do not specify one of the files,bsubuses the file name of the other. At least one must be given.
op
This is the operation to perform on the file.opmust be surrounded by white space, and is invalid without at least one oflfileorrfile. The possible values foropare:>
<
lfileon the submission host is copied torfileon the execution host before job execution.rfileis overwritten if it exists.
rfileon the execution host is copied tolfileon the submission host after the job completes.lfileis overwritten if it exists.<<
><, <>
rfileis appended tolfileafter the job completes.lfileis created if it does not exist.
lfileis copied torfilebefore the job executes, thenrfileis copied back (replacing the previouslfile) after the job completes (<>is the same as><).
If you specified an input for your job (see `Input and Output' on page 65), and the input file it is not found on the execution host, the file is copied from the submission host using the LSF JobScheduler remote file access facility. It is removed from the execution host after the job finishes.
If you specified output files for standard output and standard error, these files are created on the execution host. They are not copied back to the submission host by default. You must explicitly copy these files back to the submission host.
LSF JobScheduler tries to change directories to the
same path name as the directory where you ran the bsub command.
If this directory does not exist, the job is run in the temporary directory
on the execution host.
If the submission and execution hosts have different
directory structures, you must ensure that the directory where rfile
will be placed exists. You should always specify it with relative path names,
preferably as a file name excluding any path. This places rfile
in the current working directory of the job. The job will work correctly even
if the directory where the bsub command is run does not exist on
the execution host.
In addition, you can also specify any files that need to be transferred for the job between the submission machine and execution machine.
When developing a complex schedule containing many jobs, it is useful to organize related jobs into groups so that it becomes easier to view and manipulate them. LSF JobScheduler allows you to group your jobs into logically related job groups to make your life easier. For example, if your jobs are responsible for the calculation of different portfolios--each portfolio being calculated by a group of related jobs--then you can make every portfolio a job group that contains all jobs responsible for that portfolio. You can then define your schedules at the level of job groups, instead of individual jobs.
LSF JobScheduler supports job grouping where jobs are organized into a hierarchical tree similar to the structure of a file system. Like a file system, the tree contains groups (which are similar to directories) and jobs (which can be considered to be files). Each group can contain other groups or individual jobs. Job groups are created independently of jobs, and can have dependency conditions which control when jobs within the group are considered for scheduling.
The LSF JobScheduler system maintains a single tree under which all jobs in the system are organized. The top-most level of the tree is represented by a group named "/", the root group. The root group is considered to be owned by the primary LSF Administrator and cannot be removed. Under the root group users can create jobs or new groups. By default, if a user submits a job without a group path, the job belongs to the root group.
A job group is a collection of jobs which has a status associated with it. The possible job group status conditions are:
When a new job group is created, it is automatically given hold status. This allows you to finish building your job group hierarchy and then to release it after it is ready to be scheduled. You must explicitly release a job group in order for jobs in the job group to be scheduled. You can also explicitly give a job group hold status. This allows you to "freeze" the scheduling of the job group. See `Job Controls' on page 109 for more details.
You can create a new job group from the command line,
or from the graphical job submission tool xbsub.
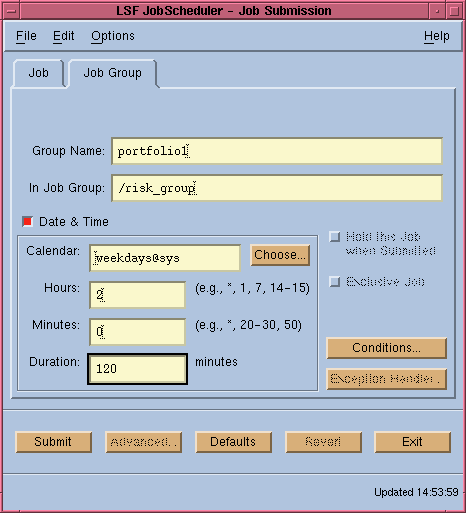
To do this using xbsub, select the "Job
Group" tab, (as shown in Figure 15) to display
the appropriate options. The job group definition options in this window are
a subset of those displayed when the "Job" tab is selected (see Figure
11). You can specify a time event dependency and other event dependencies
for a job group, just as you can for an individual job.
The "In Job Group" field specifies the parent job group path name starting from "/". If this parameter is not specified, the new group will be created under the root group.
Figure 15. Job Group Definition Window
Job groups can also be created from the command line.
The following examples show how to create a job group:
% bgadd /risk_group
This creates a job group named "risk_group" under the root group "/".
% bgadd /risk_group/portfolio1
This creates a job group named "portfolio1" under job group "/risk_group".
When creating a group from the command line, you must provide a group specification with a full group path name. The last component of the path is the name of the new group to be created. A parent job group must have been created before you create a sub-group under it.
When the group is initially created it is given HOLD status. The above example creates job groups without dependency conditions. Job groups will always have ACTIVE status once you release them from HOLD status.
Each group is owned by the person who created it. The job group owner can operate on all jobs within the job group and its sub-groups. It is possible for a user to add a job or group into a group that is owned by another user.
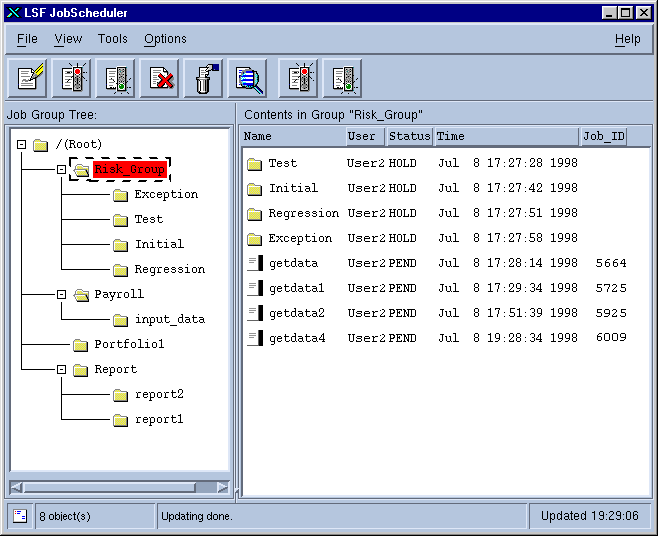
Use the xlsjs graphical tool to view job
groups and jobs under the job groups. The xlsjs tool provides an
intuitive interface for monitoring jobs and job groups. Figure
16 shows the xlsjs graphical tool.
The left side of the xlsjs GUI displays
the job group tree structure. You can expand and shrink the view by clicking
on the group names at different levels. The right side of the window displays
jobs (upper area) and job groups (lower area) under the current job group. The
current job group is highlighted in the job group tree on the left side of the
window. The views on the right side can be adjusted to show information that
is of interest to you.
The xlsjs GUI is the console window of
LSF JobScheduler. You can perform almost all LSF JobScheduler-related operations
from this window. For example, to create a new job group under "/risk_group",
simply select "/risk_group" and then choose File | New | Group.
This displays the window as shown in Figure 15.
Command-line tools are also available to view and manipulate job groups.
Figure 16. Job and Job Group Monitoring Window
After you have created the desired job groups, you can then submit jobs into them. To submit a job into a job group, select the job group and then choose File | New | Job. This displays the job submission window as shown in Figure 11, with the current working group set to the selected group.
You can also submit a job into a job group using the
bsub command. For example:
% bsub -J /risk_group/portfolio1/newjob myjob
Job <105> is submitted to default queue.
The -J option
of the bsub command, followed by a group path,
tells LSF JobScheduler the exact location of the job group
the job should belong to. If you assign a unique job name to each job
created, it will be easier for you to keep track of your jobs.
When using the command-line job submission tool, bsub,
the job name parameter should be used to specify the full path of the group
in which the job is to be placed.
You will see the submitted jobs on the right side of
the window as shown in Figure 16. You can
also view submitted jobs using the bjobs command. With the -g
option of the bjobs command, you can view job groups as well as
jobs.
If you do not see submitted jobs in the xlsjs
window, make sure that you have chosen the right filters by choosing View
| Filter Jobs. If you are submitting jobs to a newly created job group,
remember to release the job group after you submit all jobs so that the job
group can enter the ACTIVE state.
Because many jobs are operations in response to various events, the scheduling of such jobs is dependent on specific events occurring. A dependency condition is a job or job group attribute you can specify so that your job or job group gets ready to run when certain events happen. A dependency condition can be specified in terms of time events, job events, job group events, exception events, file events and user events. For a conceptual explanation of these events, see Section 3, `Events and Calendars', beginning on page 21.
If your job needs to run periodically, or at pre-determined
times, you can associate a time event with your job. A time event can be specified
at either the xbsub GUI or the bsub command line level.
To specify a time event for your job, simply enable
the "Date and Time" checkbox in the xbsub main window. You can
then specify the time event, as shown in Figure
17. A time event specification contains two parts: a calendar and a time
specification. By clicking on the "Choose" button, you can choose a calendar
from all calendars defined in the system. To view calendar details, use the
xbcal GUI.
Normally, you will choose from your own calendars and the system calendars, but you can also use other users' calendars. If you do use a calendar defined by another user, remember that the other user's calendar you are depending on can be modified by its owner without warning!
Figure 17. Specifying Time Events
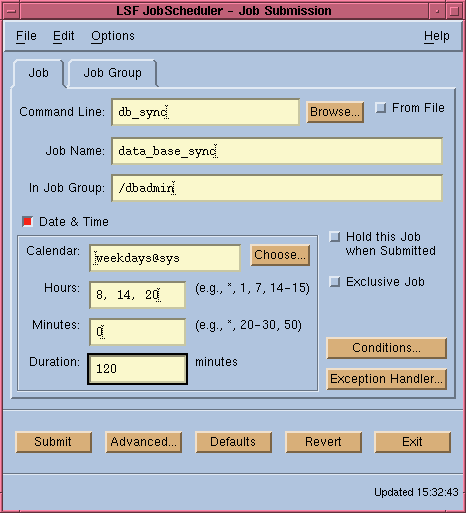
The calendar specifies the days during which the event will repeat. If you do not specify a calendar in the "Date & Time" area, LSF JobScheduler assumes the default daily calendar, i.e. every day.
The time specification area specifies the way in which the time event should repeat in a day defined by the calendar. It contains 3 fields: "Hours", "Minutes", and "Duration".
The "Hours" field specifies at which hours during the specified day(s) the event should repeat. You can specify several time points separated by commas, or a range of hours such as 5-17, or a combination of the above. The event will repeat at each hour specified in this field. Valid values for "Hours" are 0-23.
The "Minutes" field specifies at which minutes during the hour(s) specified in the "Hours" field the event should repeat. You can specify several time points separated by commas, or a range of minutes such as 10-30. The event will repeat at each minute specified in this field. Valid values for "Minutes" are 0-59.
The "Duration" field specifies how long the time event remains active after it becomes active, and should be specified in minutes. It is important that you specify a reasonable duration for your time event to allow your job time to be scheduled. The value for this parameter should not exceed its recurrence interval. For example, if the time event happens every eight hours, then the duration should not be more than eight hours. If you specify a duration that is longer than the interval, it is considered to be the same as the interval.
The job will be scheduled only if the time event is active. If the job is not able to run before the time event becomes inactive, the job is considered to have missed its schedule, and an exception will be triggered (if you have configured one). The job will not be run until the next time the event becomes active.
Time events can also be associated with jobs using
the bsub command line interface. For example:
% bsub -T "weekdays:8,14,20:0%120" dbsync
Job <107> is submitted to default queue <normal>.
See `Time Expressions
and the Command Line Interface' on page 43 for details of time expression
syntax for the command-line interface. To view the calendars in the system,
use the bcal command. See `Manipulating
Calendars Using the Command Line Interface' on page 40 for an example
of bcal command output.
Some of your jobs depend on the results of other jobs. For example, a series of jobs could process time sheet data, calculate earnings and taxes, update payroll and tax ledgers, and finally print a cheque run. Most steps can only be performed after the previous step completes.
In LSF JobScheduler, dependencies among jobs are handled by job events. Job events and job status functions are described conceptually in `Job Events' on page 23 and `Job Group Events' on page 24.
A job can also depend on one or more job groups. This is supported by job group events. A job can depend on the status of a job group. A group itself does not execute, but rather the individual jobs under the group. Therefore, the successful completion or failure of a group is determined by the state of the jobs in the group. A set of job group status functions are provided which expose the various job group counters and the group state. The concepts of job group events and job group status functions are discussed in `Job Group Events' on page 24.
By associating job status functions and job group status functions with the current job, you can define inter-job dependencies.
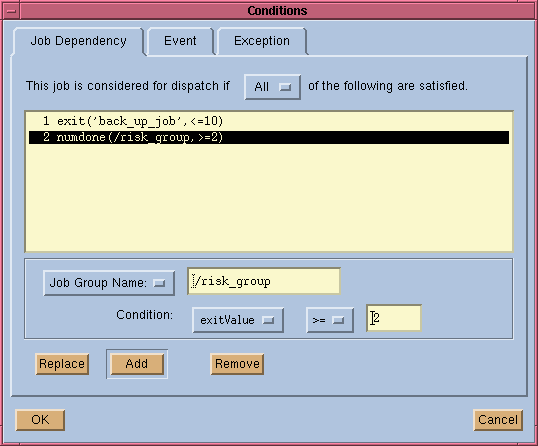
To submit a job that depends on prior jobs or job events, click on the "Conditions" button from the job submission main window. This brings up a dependency condition window as shown in Figure 18.
The function exit(back_up_job) is a job
status function and the function numdone(/risk_group) is a job
group status function. For a complete list of job status functions and job group
status functions, see `Built-in Events' on page 23.
As can be seen in Figure 18, a job can depend multiple jobs or job groups. In the above example, the dependency condition says the current job will be scheduled when back_up_job has exited with exit code being less than or equal to 10 and when the number of done jobs in job group /risk_group is greater than or equal to 2. Note that you can use either job ID or JobName to specify a job dependency. In any case, the job or job group to be depended on must already exist before you can create a dependency on it.
A wildcard character `*' can be specified
at the end of a job name to indicate all jobs matching the name. For example,
jobA* will match jobA, jobA1, jobA_test,
jobA.log etc. There must be at least one match. If more than one
job matches, your job will depend on every one of the jobs.
Figure 18. Inter-Job Dependency Condition Window
While jobId may be used to specify the
jobs of any user, the job name can only be used to specify your own jobs. If
you submitted more than one job with the same job name, all jobs with that name
are assumed.
The prior jobs are identified by the job ID number or a job name. The job ID is assigned by LSF JobScheduler when the job is submitted. If you did not supply a name during job submission, the system uses the last 60 characters of the submitted command as the job name.
Inter-job dependency can also be specified at the command
level using the bsub command. Below are a few examples.
If your job only requires that the prior job has started
processing (and it does not matter if it has completed), use the started
keyword.
% bsub -w "started(first_job)" -J second_job time_card
If your job requires that the prior job
finished successfully, use the keyword done.
% bsub -w "done(pre_process)" -J main_process cheque_run
If your job depends on the prior job's
failure (for example, it is responsible for error recovery should the prior
job terminate abnormally), use the keyword exit.
% bsub -w "exit(main_process)" -J error_recovery re_run
If your job depends on a particular exit value of another job, the value can be given in the exit function.
% bsub -w "exit(main_process,100)" -J error_recovery re_run
If the job depends on a range of exit values of another job, the range can be given as:
% bsub -w "exit(main_process,< 100)" -J error_recovery re_run
When your job only requires that the prior
job has finished, regardless of the success or failure (for example, the prior
task may end successfully, but with a non-zero exit code), use the keyword ended.
% bsub -w "ended(cheque_run)" -J clean_up clean
If you submit a job that depends on a repetitive prior
job, then the newly submitted job also becomes a repetitive job, that is, it
will go to the PEND status after it completes a run instead of
being removed from the system.
Specifying only jobId or jobName
is equivalent to done(jobId|jobName).
A numeric job name should be doubly quoted, for example
-w "'210'", since most UNIX shells treat -w "210"
the same as -w 210, causing it to be treated as a jobId.
The simplest inter-job dependency condition is a jobId
or a job name.
% bsub -w 8195 jobB
Your job may depend on a number of previous jobs. In
the example following, the submitted job, dependent, will not start
until job 312 has completed successfully, and either the job named
Job2 has started or the job named Job3 has terminated
abnormally.
% bsub -w "done(312) && (started(Job2) || exit(Job3))" \
-J dependent command
The following submitted job will not start until either
job 1532 has completed, the job named jobName2 has
completed, or all jobs with names beginning with jobName3 have
finished.
% bsub -w "1532 || jobName2 || ended(jobName3*)" -J NumberDepend command
If any one of the conditional jobs is not found, the
bsub command will fail and the job cannot be submitted.
File events monitor the status of files and can be used to trigger the scheduling of your jobs. The concepts of file events and file status functions are discussed in `File Events' on page 27. A file event dependency can be specified in logical expressions of file status functions.
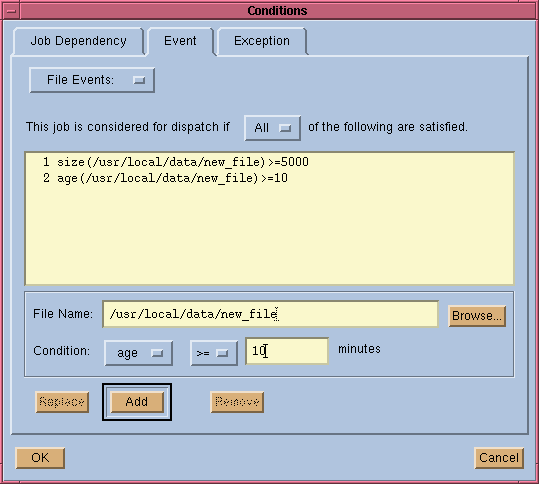
With the GUI interface, defining a file event dependency is fairly straightforward. Figure 19 shows the file event dependency window. This window is brought up when you click on the "Conditions" button from the job submission window as shown in Figure 11, and then select the "Event" tab.
As shown in Figure 19,
you can specify multiple file event dependency conditions for your job. Note
that in the GUI the size parameter of the file is in kilobytes, and the age
parameter is in minutes. Once a job with file event dependency conditions is
submitted to the system, LSF JobScheduler will register a file event with the
External Event Daemon (eeventd) which then monitors the status
of the specified file periodically. Once the status of the file event changes,
the eeventd will inform LSF JobScheduler about the change.
In the example shown in Figure 19, the dependency condition is considered satisfied if and only if all of the event conditions listed evaluate to TRUE. You can also specify that the dependency condition be satisfied if any of the event conditions listed evaluates to TRUE.
For a complete list of all available file status functions, see `File Events' on page 27.
Figure 19. File Event Dependency Window
A file event dependency condition can also be specified
when you submit a job using the bsub command line with the "-w"
option and the file keyword. Here are a few examples.
% bsub -w "file(age(/u/db/datafile) > 2H)" command
This creates a job that runs when the file /u/db/datafile
is more than 2 hours old. Note that "H" here stands for hour. Other characters
that you can use to represent a time duration include D (day) and
W (week). The default is M (minute).
If you want to trigger the job execution by the creation
of a file, use the arrival() function. This function detects the
transition of the specified file from non-existence to existence.
% bsub -w "file(arrival(/usr/data/newfile))" -R "type==hppa" command
This creates a job that runs when file newfile
is detected in /usr/data directory. Also note that a resource requirement
is specified so that this command should only be run on an hppa
host.
Unlike the age() function, the arrival()
function does not need a relational operator because the function evaluates
to either TRUE or FALSE.
If you are only interested in the existence of the
file instead of the transition of the creation, you can use the exist()
function.
% bsub -w "file(!exist(/usr/data/lock_file))" command
This tells LSF JobScheduler to run the job if file
/usr/data/lock_file does not exist.
Use the function size() if you want to
run a job when the size of the file becomes a certain value.
% bsub -w "file(size(/var/adm/logs/log_file) >= 3.5 M)" command
The character M refers to megabytes. You
could also use K to refer to kilobytes. The default is bytes. Like
the age() function, the size() function also requires
a relational operator to form a logical expression that evaluates to either
TRUE or FALSE.
The file event you are depending on may be on another host.
% bsub -w "file(exist(hostd:/usr/local/fileA))" command
You can submit a combination of functions. The evaluation
of the statement depends on the operators you use. In the following statement,
the command will be run if either fileA exists or fileB
arrives (is created).
% bsub -w "file(exist(/usr/data/fileA) || arrival(/usr/data/fileB))" \
	 command
The following statement will evaluate to TRUE
only if fileA exists and fileB has arrived.
% bsub -w "file(exist(/usr/data/fileA) && arrival(/usr/data/fileB))" \
	 command
The following command will be run if fileA
exists and its size is greater than or equal to 1MB.
% bsub -w "file(exist(/usr/data/fileA) && \
	 size(/usr/data/fileA) >= 1M)" command
You must specify the absolute path name of the file in a file status function.
A job can be triggered by an exception condition of another job. The concept of job exception events is discussed in `Job Exception Events' on page 25.
The job exception dependency can be specified either at the command line using bsub or using the job submission GUI. Below is a command line example,
% bsub -w "exception(event_name)" recoveryjob
This creates a job that will respond to the job exception
event event_name. By specifying the "exception" keyword,
you register a job exception event into LSF JobScheduler which monitors the
status of this event. event_name is an arbitrary string specified
by the user.
The event specified here will remain inactive until
it is set to active by a real exception from another job. To do so the other
job must be submitted with an exception handler to explicitly set the exception
event when the exception happens. This can be done by using the setexcept
action as its exception handler. When an exception handler sets the exception
event to active, this triggers all jobs waiting on the job exception event.
Exception handling is discussed in greater detail in `Exception Handling and Alarms' on page 123.
You should read this section only if your cluster administrator
has installed site-specific event detection functions into the External Event
Daemon (eeventd).
The concept of user events is described in `User Events' on page 28. You can only use the valid user event functions defined for your site.
A user event is created when submitting a job using
the event keyword. For example, you want to define a user event
to detect the status of a tape device before a backup job starts. If the status
of the tape device is READY, the event becomes active,
otherwise it is always inactive. You can submit the following command:
% bsub -w "event(tape_ready)" BackUp
A user event, tape_ready, is registered
by LSF JobScheduler into the External Event Daemon (eeventd), which
then monitors the event. The string "tape_ready" is passed to the
eeventd by the master scheduler (mbatchd). The eeventd
is responsible for interpreting the string passed to it and must be able to
associate the event string passed to it with the actual device or event on which
you are dependent.
The above example is a simple one in which the string
passed to eeventd is a simple string. In fact, your site can have
complex syntax defined within the string to provide more sophisticated event
status functions, in which case, you must follow the semantics defined by your
site in specifying the event dependency condition.
The External Event Daemon (eeventd) is
a site-specific daemon that is customized and installed by the LSF JobScheduler
administrators. See "External Event Management" in the LSF JobScheduler Administrator's
Guide.
You can submit a job with a combination of conditions. Simply specifying all needed dependencies from the GUI will allow the job to depend simultaneously on time events and multiple other events.
At the command line, use the -T and -w
options of the bsub command to specify dependency conditions. The
evaluation of the statement depends on the logical expressions you specify.
For example:
% bsub -w "done(jobA) && file(exist(fileA))" -J jobB command
The above statement will evaluate to TRUE
if jobA has completed successfully and fileA exists.
You can synchronize jobs by running the first job from a calendar and submitting the second job to be dependent on the successful completion of the first.
% bsub -T "00:00" -J jobA command
Job <8085> is submitted to default queue <default>.

% bsub -w "done(jobA)" -J jobB command
Job <8086> is submitted to default queue <default>.
In the above example, jobB will be run every time jobA completes successfully. Since jobA is a repetitive job, jobB also becomes repetitive because of the dependency. If jobA is modified to follow a different calendar, jobB will still run after jobA.
There are a few other parameters you can specify for your job to further tune the behaviour of your jobs and schedules.
If your job is a parallel application, you can also
specify the number of processors your job requires to run. You can either choose
a range of numbers or a single number. If you choose a range, LSF JobScheduler
will schedule the job as long as the number of available processors meets the
minimum number. In this case, your parallel application must be able to run
with a varying number of processors. If your application has a fixed parallelism,
choose a single number, in which case LSF JobScheduler will run your parallel
job with exactly that number of processors. This parameter can be specified
in the GUI as shown in Figure 12, or you
can also specify it from the bsub command line using the -n
option.
You can also choose start and termination time ranges for your job. Your job will not start until after its start time and will be terminated and removed from the system when the termination time is reached. The start and termination times define your job's life. You do not have to specify both start time and termination times. If a start time is not specified, the default is any time. If a termination time is not specified, the default is never.
Note the difference between the start time/termination time pair and a time event that has a start time and duration. A time event specifies a duration in which the job should be scheduled. The job does not have to finish within the time event duration. A job can only run once for each time duration. The start time and termination time of a job specifies the active life time of a job. The job can run many times within the time range and the job will be terminated and removed from the system when termination time arrives.
The start time and termination time of a job can be
specified as shown in Figure 12, or from
the bsub command line using options -b and -t.
An exclusive job is a job that runs on its own on a
machine. LSF JobScheduler will not mix an exclusive job with other jobs. You
can define an exclusive job if you want guaranteed performance for that job.
Click on "Exclusive" in the job submission window, as shown in Figure
11, to submit the job as an exclusive job. You can also do this from the
bsub command line using the -x option.
A job can be submitted so that it is suspended until it is explicitly resumed by the user or administrator. This type of job is referred to as an ad-hoc job. It is put into the PSUSP state as soon as it is submitted, and a user must resume the job explicitly before it can run. After completion, the job is put back into the PSUSP state waiting for the next run.
Use the -H option of the bsub
command to submit an ad-hoc job from the command line. The bresume(1)
command causes the job to go into the PEND state, from which it can be scheduled.
You can also submit an ad-hoc job from the Job Submission window of the LSF
JobScheduler xbsub GUI, shown in Figure
11 on page 64. Simply enable the "Hold this Job when Submitted" checkbox
before clicking on the "Submit" button.
After completion, the job is put back into the PSUSP state waiting for the user to run it once again.
Submitting an ad-hoc job is a useful solution whenever you have a job you need scheduled only when a user requests it. For example, the lead job in a complex schedule of dependent jobs may be an ad-hoc job. Whenever the lead job is released and run, the downstream jobs are triggered. Every time you want to execute the schedule, you need only release the lead job.
You can define exceptions for your job and associate exception handlers to process the exceptions automatically. Exception handlers can be specified at job submission time as shown by the "Exception Handler" button in Figure 11 on page 64. This topic will be addressed in greater detail in `Exception Handling and Alarms' on page 123.