LSF JobScheduler provides a single system image for your cluster so that you can use the whole cluster as if it were a single computer. As such, you can monitor, control, and manipulate your jobs, job groups, and schedules from any host in the cluster through a uniform interface.
The xlsjs GUI as shown in Figure 11 on page 64 is the focal point of all operations. If you do not have any job group defined in the system, you will be seeing only the root job group. All jobs submitted without a job group specification are in the root job group.
If your system has job groups defined by users, you can use xlsjs to walk through the job group tree to see the jobs and sub-groups at each level.
You can also manipulate your jobs and job groups through LSF JobScheduler command-level tools.
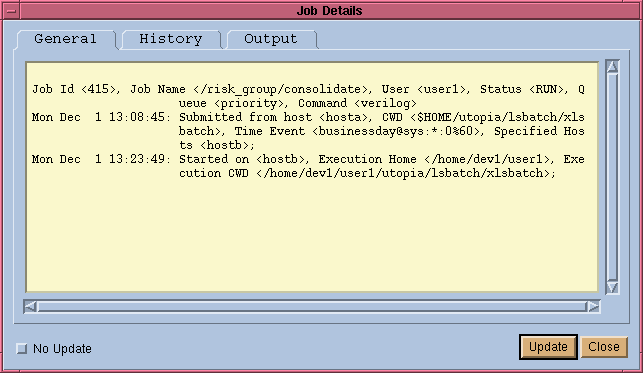
As you walk through the job group tree, you can view all jobs and their status. To view the details of a particular job, double click on the job to get a job detail window, as shown by an example in Figure 20.
Depending on the current job status, the job detail information can be different. If the job is already running, the details will contain information about the job execution, such as execution host, process IDs of the job, resources used so far, and current working directory on the execution machine.
If the job is currently in PEND status, the job detail information will tell you why.
For suspended jobs, the job detail information will include why the job was suspended.
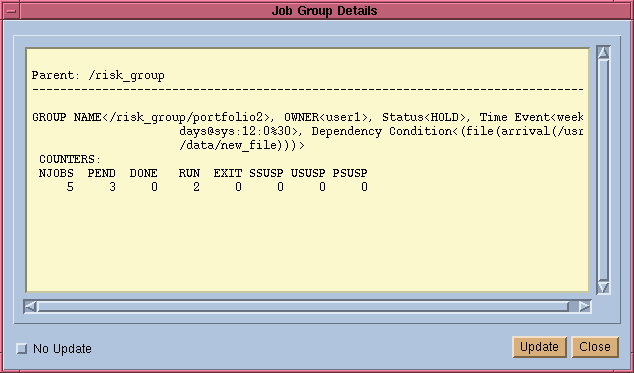
To view the details of a job group, select the job group from the xlsjs GUI and then choose File | Details. You can also achieve this by double-clicking on the group listed on the right hand side of the window. The job group details will be displayed in a popup window as shown in Figure 21.
Figure 21. Job Group Detail Window
Job and job group information can also be viewed from the command line using the bjobs command. For example:
% bjobs -a
JOBID USER  STAT QUEUE     FROM_HOST EXEC_HOST JOB_NAME   SUBMIT_TIME
1031  user1 PEND priority  hostc               /sleep 567 Nov 27 16:23
887   user1 DONE priority  hostc     hostb     *nsolidate Nov 27 15:36
1006  user1 DONE priority  hosta     hostb     *nsolidate Nov 27 16:00
Note if you do not specify the -a option, jobs having DONE and EXIT status will not be displayed. By default bjobs will only display the jobs you submitted. Use the -u user_name option to view the jobs of other users. Use the reserved user name all to see the jobs of all the users.
% bjobs -u all
JOBID  USER  STAT  QUEUE    FROM_HOST EXEC_HOST  JOB_NAME   SUBMIT_TIME
6745   user2 RUN   business hostd     hostb      report     Dec 19 09:04
6916   user3 RUN   business hosta     hostd      analyse    Dec 19 09:05
6848   user1 PEND  sysadm   hosta                diskcheck  Dec 17 11:52
7142   user1 PEND  sysadm   hosta                backup     Dec 21 15:45
7157   user4 PEND  night    hosta                forecast   Dec 18 10:56
Use the -s option to view the suspended jobs only. Along with the job information, it also shows the reason why the jobs are suspended.
% bjobs -s
JOBID USER   STAT   QUEUE   FROM_HOST  EXEC_HOST  JOB_NAME  SUBMIT_TIME
1999  user1  PSUSP  default hosta                 joba      Dec 10 15:33
The job was suspended by user or system admin while pending;
Use -p option to view the pending jobs only. Along with the job information it also shows the reason why each job was not dispatched during the last dispatch turn.
% bjobs -p
JOBID USER  STAT   QUEUE    FROM_HOST  EXEC_HOST  JOB_NAME  SUBMIT_TIME
1999  user1 PSUSP  default  hosta                 joba      Dec 10 15:33
The job was suspended by user or system admin while pending;
5518  user1 PEND  default   hosta                 jobb      Dec 14 10:27
Job dependency condition not satisfied;
8056  user1 PEND  default   hostA                 jobb      Dec 20 11:41
Job dependency condition not satisfied;
To get the details of your job, use the -l option of the bjobs command:
% bjobs -l -J /risk_group/consolidate
Parent: /risk_group
Job Id <887>, Job Name </risk_group/consolidate>, User <user1>, S
	 tatus <RUN>, Queue <priority>, Command <myj
	 ob>
Thu Nov 27 15:36:39:	 Submitted from host <hosta>,CWD <$HOME>, Ex
	 clusive Execution, Requested Resources <hpu
	 x>, Time Event <businessdays@sys:*:0%60>;
Thu Nov 27 15:37:15:	 Started on <hostc>;
Thu Nov 27 15:41:53:	 Resource usage collected. MEM: 440 Kbytes;
	 SWAP: 1 Mbytes PGID: 21699; PIDs: 21699
You can get the same output by running the bjobs command with jobId as the parameter instead of job group path name.
You can view job group information from the command line, too. This is supported by the -g option of the bjobs command. For example,
% bjobs -g
Parent: /
GROUP      STAT     OWNER  NJOBS  PEND DONE  RUN EXIT SSUSP USUSP PSUSP
fund1_grp  ACTIVE   user1  5      4    0     1   0    0     0     0
fund2_grp  ACTIVE   user1  11     2    3     5   1    0     0     0
bond_grp   HOLD     user4  2      2    0     0   0    0     0     0
risk_gr*   ACTIVE   user2  2      1    1     0   0    0     0     0
admi_grp   INACTIVE user3  4      4    0     0   0    0     0     0

JOBID USER  STAT  QUEUE   FROM_HOST EXEC_HOST JOB_NAME     SUBMIT_TIME
1031  user5 PEND  normal  hostd               /simulation  Nov 27 16:23
The -g option makes the bjobs command display job group information as well as job information. It is similar to a directory listing in a file system. By default, the bjobs -g command lists all job groups under the Root job group together with all jobs directly submitted into the Root (/) job group. If you specify a -J /a/b/ group path together with the above command, it will display all job groups under the group /a/b together with all jobs submitted to the /a/b job group level.
The job counters listed from the above output give a summary of jobs inside the job group tree by different status. If you want to see all job groups and all jobs at all levels, use "-R" option together with "-g" option of the bjobs command.
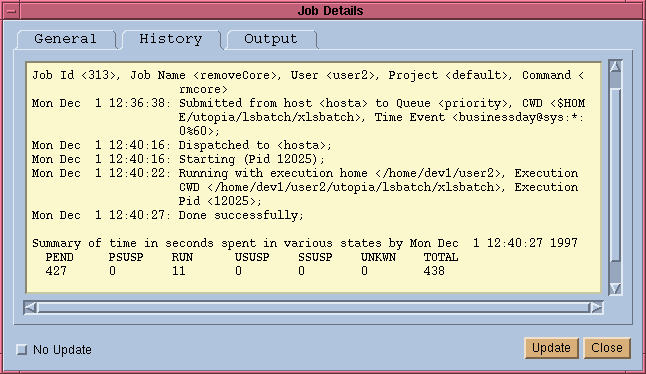
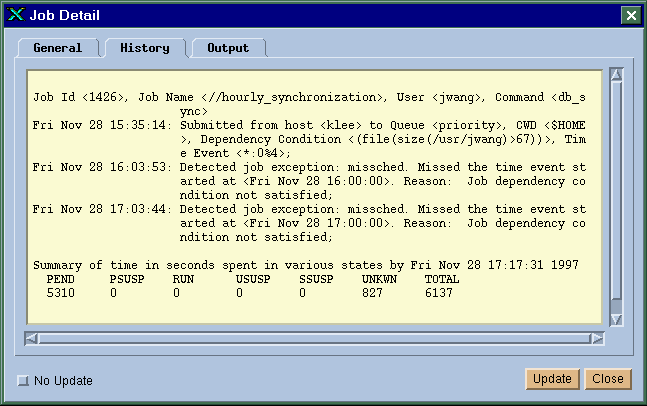
You may need to know what has happened to your job since it was submitted. By clicking on the "History" tab of the Job Details window, you can see the history of your job, as shown in Figure 22. Job history tells you in chronological order what has happened to your job. It also gives you statistics about how long the job has stayed in each job state cumulatively.
The xlsjs GUI allows you to see the history of jobs currently in LSF JobScheduler. If you want to see the history of a job that was already deleted from LSF JobScheduler, you must use the bhist command.
% bhist -l 7848
Job Id <7848>, Job Name <diskcheck>, User <user1>,Command <find -
	 name core -atime +7 -exec rm {} \;>
Tue Dec 16 11:52:13:	 Submitted from host <hostA> to Queue <defau
	 lt>, CWD <$HOME>, Dependency Condition <cal
	 endar(weekdays)>;
Sat Dec 20 07:00:12:	 Started on <hostA>, Pid  <29027>;
Sat Dec 20 07:00:12:	 Running with execution home </home/user1/>,
	 Execution CWD </home/user1>;
Sat Dec 20 07:00:55:	 Done successfully. The CPU time used is 12.
	 .2 seconds;
Sun Dec 21 07:00:05:	 Started on <hostA>, Pid <986>;
Sun Dec 21 07:00:05:	 Running with execution home </home/user1>,
	 Execution CWD </home/user1>;
Sun Dec 21 07:01:18:	 Done successfully. The CPU time used is
	 11.9 seconds;
Mon Dec 22 07:00:02:	 Started on <hostA>, Pid <2892>;
Mon Dec 22 07:00:02:	 Running with execution home </home/user1>,
	 Execution CWD </home/user1>;
Mon Dec 22 07:01:13:	 Done successfully. The CPU time used is 10.
	 5 seconds;
Tue Dec 23 07:00:10:	 Started on <hostA>, Pid <4905>;
Tue Dec 23 07:00:10:	 Running with execution home home/user1>, Ex
	 ecution CWD </home/user1>;
Tue Dec 23 07:03:31:	 Done successfully. The CPU time used is 19.
	 7 seconds;
Tue Dec 23 15:17:14:	 Delete requested by user or administrator <
	 user1>;
Tue Dec 23 15:17:14:	 Exited. The CPU time used is 0.0 seconds.

Summary of time in seconds spent in various states by Tue Dec 23 15:17:14 1997
  PEND     PSUSP    RUN    USUSP    SSUSP    UNKWN    TOTAL
  617057   0        44     0        0        0        617101
LSF JobScheduler keeps job history information after the job completes a run, so you can look at the history of jobs that ran in the past. The length of the history depends on how often your LSF administrator cleans up old log files. Unless a job ID or a time range (using -S, -C, -D, or -T) is specified, bhist only displays recent job history, i.e. history stored in the current event log file.
The bhist command also allows you to display the history of all jobs chronologically rather than on a per job basis. This gives you a real trace of what exactly happened in the whole system. This is done through the -t and -T option of the bhist command:
% bhist -t -T "1997/9/22/18:00,1997/9/22/19:00"
Mon Sep 22 18:50:00:	 Job <429> Pending: Job has been requeued;
Mon Sep 22 18:50:00:	 Job <429> Dispatched to <hostb>;
Mon Sep 22 18:50:01:	 Job <429> Starting (Pid 24289)
Mon Sep 22 18:50:01:	 Job <429> Running with execution home </hom
	 e/dev2/user1>, Execution CWD </home/dev2/us
	 r1>, Execution Pid <24289>, Execution user
	 name <user1>;
Mon Sep 22 18:52:36:	 Job <750[19]> Pending: Waiting for scheduli
	 ing after resumed by user;
Mon Sep 22 18:52:52:	 Job <750[19]> Dispatched to <hostc>;
Mon Sep 22 18:53:16:	 Job <750[19]> Starting (Pid 24708)
Mon Sep 22 18:53:17:	 Job <750[19]> Running with execution home <
	 /home/dev2/ussr2>, Execution CWD </home/dev
	 2/user2>, Execution Pid <24708>, Execution
	 user name <user2>;
Mon Sep 22 18:53:23:	 Job <429> Done successfully;
Mon Sep 22 18:53:56:	 Job <750[19]> Done successfully;
This displays job history between 6 PM to 7 PM of September 22. If you specify -t but not -T, bhist assumes the time range of from one week ago to now.
You can view the output from the standard output and standard error while the job is running. This can be done through the GUI by clicking on the "Output" tab of the window shown in Figure 20 on page 96.
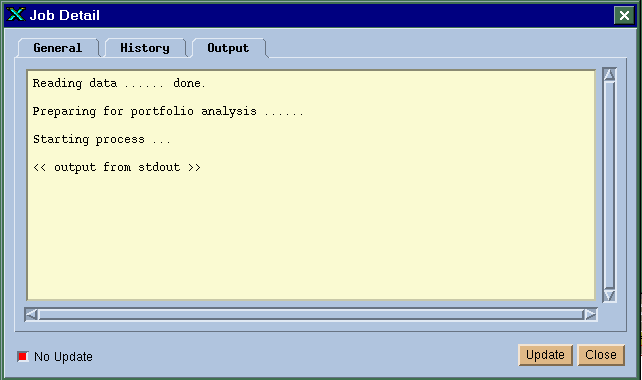
You will only be able to see the output of your own jobs. This is only possible while your job is in RUN, SSUSP, or USUSP status. If the job has not been started or has finished, you cannot see the output. If your job is already finished, the output should be already in the output file as specified in the job submission. See `Input and Output' on page 65 for details.
You can also view the output of your job using the bpeek command.
From the xlsjs GUI shown in Figure 16 on page 79, you can perform different operations on jobs and job groups. You can modify the attributes of a submitted job by selecting the job and then choosing File | Modify. You can also do this by selecting the job and then clicking on the job modification toolbar. This will bring up the Job Modification window, as shown in Figure 24.
Figure 24. Job Modification Window
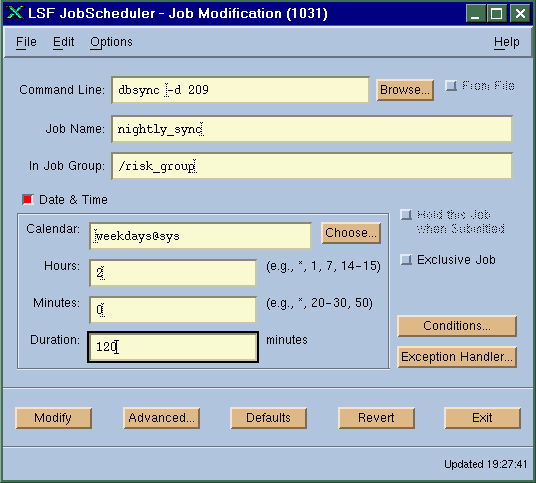
The job modification window is almost the same as the job submission window, except that it pre-loads the existing job parameters from LSF JobScheduler. This allows you to make changes to any parameters. After you finish the changes, click on the "Modify" button to commit the changes into LSF JobScheduler.
Job modification will have an effect only on future executions of the job. If the job is running while you do the modification, the current execution will still use the original parameters.
Job modification can be done at the command level using the bmod command. The bmod command has a set of options similar to those of the bsub command. The value for the option you want to modify is overridden with a new value using the same option syntax as the bsub command. However if you want to modify the actual command line for the job, you need to use the -Z option of the bmod command. For example,
% bmod -Z "new_cmd arg" 848
Parameters of job <848> are being changed
The argument for -Z must be enclosed in quotes if it contains more than one string.
It is a little bit more complicated if you use bmod to reset an option to its default value. Use the option string followed by 'n'. No value should be specified when resetting an option. For example,
% bmod -Tn 848
This removes the time event dependency for job 848.
You can only modify jobs owned by yourself and other users; jobs submitted under job groups owned by you. LSF administrator can modify jobs of all users.
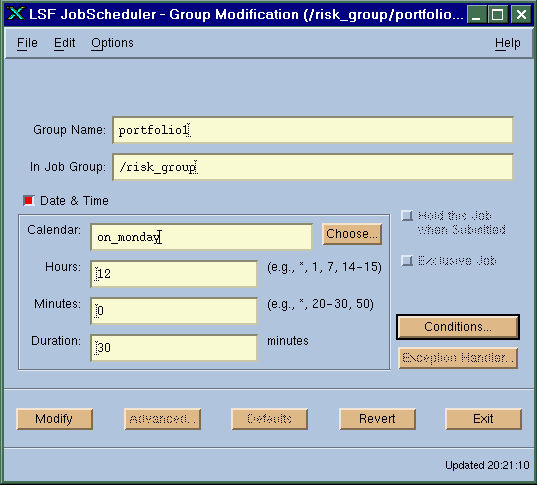
Job groups can be modified in a way similar to that in which jobs are modified. Since the dependency conditions specified at the job group level affect all jobs and job groups in the job group tree, by modifying job group parameters you effectively modify the scheduling behaviour of all jobs belong to the group tree.
Figure 25 shows the job group modification window. This window appears when you select the group from the xlsjs GUI and then choose File | Modify.
As with job modification, modification to a job group has no immediate effect on jobs that are already running. It only affects the future scheduling of jobs. However, changing the dependency conditions of a group can cause the status of a job group and all sub-groups to change. For example, if you change the time event dependency of a group and the time event is currently inactive, then the status of the job group and all its sub-groups which have ACTIVE status will immediately become INACTIVE. Jobs already started will continue to run, but jobs that are not scheduled yet will be prevented from further scheduling until the status of the job group becomes ACTIVE again.
You can modify your own job groups and other users' job groups that are created under job groups owned by you. The LSF administrator can modify job groups of all users.
Figure 25. Job Group Modification Window
By deleting a job, the job is removed from the memory and the job becomes history. You will be able to see the deleted job from the job history by running bhist command.
If the job is currently running, deleting a job kills the job before removing the job from the system. If the job has any events associated with it, these events will also be removed from the system unless these events are still in use by other jobs or job groups.
You can delete jobs or job groups owned by yourself and jobs and job groups that are created by other users underneath a job group owned by you. The LSF administrator can delete jobs or jobs groups owned by all users.
A job can be deleted easily using the GUI. Click on the job to be deleted and choose File | Delete. Or you can click on the job deletion toolbar after selecting the job.
You can also use the bdel command to remove a job.
% bdel 3456
Job <3456> is being deleted
You can specify a job by name using the -J option.
% bdel -J jobA
Job <3457> is being deleted
To delete all jobs directly underneath a job group tree, specify the group path with the bdel command:
% bdel -J /risk_group/
Job <1202> is being deleted
Job <1203> is being deleted
Job <1204> is being deleted
To delete all jobs in a group recursively, use the -R option:
% bdel -R -J /risk_group/
Job <1202> is being deleted
Job <1203> is being deleted
Job <1204> is being deleted
Job <1205> is being deleted
Job <1206> is being deleted
Note that the "/" following the group path is necessary. If the group path is not followed by a "/", the last component in the path is considered as a job instead of a job group.
To remove all jobs inside a job group tree recursively at all levels, use the -R option of the bdel command.
A job group can be deleted from the GUI by selecting the job group and choosing the "Delete" from the "Group" pull-down menu. By deleting a job group, you delete all jobs and job groups under the current job group. All events associated with the entire job group tree will be removed as well unless they are also associated with other jobs or job groups.
To remove a job group from the command level, you must first remove all jobs inside the job group tree by running bdel command with option -R, then remove the job group tree with the bgdel command.
% bdel -R -J /risk_group/
Job <1202> is being deleted
Job <1203> is being deleted
Job <1204> is being deleted
Job <1205> is being deleted
Job <1006> is being deleted

% bgdel /risk_group
Job group /risk_group is deleted.
If you want to delete your job after certain a number of runs, use the -n option of the bdel command. This allows you to specify the number of times your job will execute before it is deleted. After the job runs for the specified number of times, it will be deleted from the system. For example,
% bdel -n 5 -J jobA
Job <8087> will be deleted after running next 5 times
After the jobs have been created, you can control their execution and scheduling using LSF JobScheduler's user interface tools. You can control jobs or job groups owned by yourself and jobs and job groups that are created by other users underneath a job group owned by you. The LSF administrator can control jobs or jobs groups owned by all users.
Terminating a repetitive job kills the current run, if the job has been started, and requeues the job. If the repetitive job is in PEND or PSUSP status, i.e., not running, termination has no effect. However, if the job is not a repetitive job, terminating the job has the same effect as deleting the job.
On UNIX, termination sends a sequence of signals to the job in the following order: SIGINT followed by a 10 second delay, then SIGTERM followed by another 10 second delay, and then SIGKILL. On Windows NT, job control messages replace the SIGINT and SIGTERM signals, and termination is implemented by the TerminateProcess() system call. The 10 second delays are configurable by your LSF administrator. See the LSF JobScheduler Administrator's Guide for details.
You can only terminate your own jobs, or jobs of all users submitted underneath job groups owned by you. The LSF Administrator can terminate jobs of all users.
To terminate a job, select the job from the GUI and then choose File | Terminate. This same can be done by clicking on job termination toolbar after selecting the job.
bkill is the command line interface for terminating a job. For example,
% bkill 3467
Job <3467> is being terminated
You can perform a termination operation for all jobs inside a job group tree by choosing File | Terminate Jobs, or by running the bkill command with option -R and by specifying job group path. For example,
% bkill -R -J /risk_group/
Job <1413> is being terminated
Job <1414> is being terminated
Job <1415> is being terminated
Job <1416> is being terminated
If you only want to kill all jobs at one group level, do not use -R,
% bkill -J /risk_group/
Job <1413> is being terminated
Job <1414> is being terminated
You can use bkill to send an arbitrary signal to your job using the -s option. You can specify either the signal name or the signal number. On most versions of UNIX, signal names and numbers are listed in the kill(1) or signal(2) manual page. On Windows NT, only customized applications will be able to process job control messages specified with the -s option.
% bkill -s SIGTSTP 3488
Job <3488> is being signalled
This example sends the SIGTSTP signal (terminal stop) to the job.
You can also use bkill to send signals to all jobs inside a group tree or at one group level by using -R option and by specifying the group path.
Suspending a running job stops the job from running, freeing up CPU and memory resources. However, the job is not killed. It is still kept in the virtual memory and can be resumed later. On UNIX, this is implemented by sending a STOP signal to the job. On NT, an equivalent function is implemented.
Suspending a job that has not started yet causes the job to go into PSUSP status. A job in PSUSP status is held from scheduling until it is released explicitly.
To suspend a job, select it and then choose Job | Suspend. You can resume a job in the same way.
There are also command line tools for suspending and resuming jobs. To suspend a job, run the bstop command:
% bstop -J diskcheck
Job <7848> is being stopped
Use the bresume command to resume it:
% bresume -J diskcheck
Job <7848> is being resumed
Note that the -J option of all commands refers to a job name. If the job name does not start with a "/", it is supposed to be in the Root job group ("/"). If a job name ends with a "/", then it is a pure job group path.
Resuming a user-suspended job does not immediately put your job into RUN state. The job must first satisfy its dependency conditions. bresume first puts your job into SSUSP state. The job can then be scheduled accordingly.
You can do group wide job suspending and resuming by specifying a group path and by using the -R option of these commands. This is similar to all other job control commands we have discussed in the previous sections.
A job can be forced to run regardless of its scheduling conditions. This is desirable in certain situations, e.g., when performing a corrective action as a result of an unscheduled job.
You can force your own jobs as well as jobs submitted by other users under a job group owned by you. The LSF administrator can force any users' jobs to run.
To force a job to run, select the job and choose File | Run Now. The command line equivalent of this function is the brun command. For example,
% brun -m hosta 7884
Job <7884> is being forced to run.
Note that you must specify a host name on which the job should run.
Job groups are containers for jobs. As such, we can control the schedule of the whole group of jobs at the group level. Job group control can change the status of a job group into HOLD or release its status from HOLD.
Putting a job group on hold prevents jobs under the group from being scheduled. There are several situations where holding a job group is useful. If you want to define many jobs under a job group tree, while you are in the process of defining inter-job dependencies, you do not want LSF JobScheduler to schedule any of the jobs because you have not finished defining all the necessary dependencies. If you want to make modifications to several jobs in a job group tree, you do not want the jobs to be accidentally scheduled before you finish the changes.
By default, when a new job group is created, it is put into HOLD status. You must explicitly release the job group by releasing it. To release a job group, select the job group and choose File | Release. When you hold or release a job group from the GUI, all sub-groups will also be held or released recursively.
If you want to hold a job group, select the job group and choose File | Hold.
The tools `bghold' and `bgrel' can be used to perform the equivalent operations from the command-line. Both commands take a group name as a parameter. For example:
% bghold /a/b/c
will hold the group /a/b/c and all subgroups.
% bghold "/a/b/c/g*"
will hold the groups beginning with `g' under the group /a/b/c.
% bgrel /a/b/c
will release the group /a/b/c and all subgroups.
% bgrel -d /a/b/c
will release the group /a/b/c but not any sub-groups.
Sometimes you may need to examine the schedules of your jobs to make sure the schedules are met. You may have made a mistake in defining jobs and thus the jobs were not scheduled as expected. Or certain events had not happened for some reasons.
There can be many reasons causing the job to not run. One obvious reason might be that you forgot to release the job group so that it is no longer in HOLD status.
You may have specified a resource requirement that will never be satisfied, or the system load has been too heavy to be able to run any additional jobs. You may have specified a duration for a time event that is too short for a host to become available to run your job.
Fortunately, LSF JobScheduler provides you with the information you would need to find out why your jobs did not make the schedule.
Figure 26 shows a job history window that explains what happened to your job's schedule.
Figure 26. Job Schedule History
Frequently you will need to know what is happening in the system and relate it to your job's schedule, and take some actions to correct problems with your network. LSF JobScheduler provides you with a complete picture of what is happening to your system from different angles.
If your job depends on one or more events, you should check the status of the events so that you know what has caused your job to run or not to run unexpectedly.
The status of all job or job group related events is obvious from the job or job group details, as was discussed in `Viewing Details of a Job or Job Group' on page 95.
The status of time events can be viewed by looking at the date and time parameters of the job and by checking the status of the calendar. The status of calendars can be viewed using xbcal GUI, as was discussed in `Using the LSF JobScheduler - Calendar GUI' on page 33. You can also view calendar status using the bcal command, as was discussed in `Manipulating Calendars Using the Command Line Interface' on page 40.
For file events, exception events, and user events, you can view their status by running the bevents command, as was discussed in `Viewing Events' on page 29.
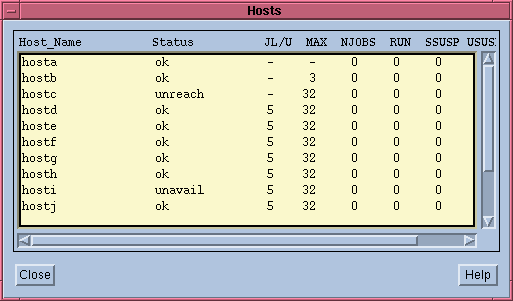
To know the status of each LSF JobScheduler server host, choose Tools | Hosts in the xlsjs main window. This command displays the host window shown in Figure 27. Right-click to customize the view. The status of hosts is displayed in the List view, and is indicated by colour in the icon view.
Figure 27. Host View of LSF JobScheduler
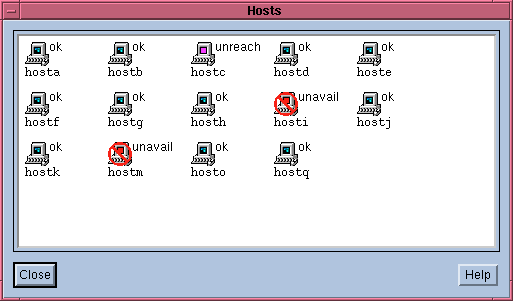
Figure 28. Host View in List Format
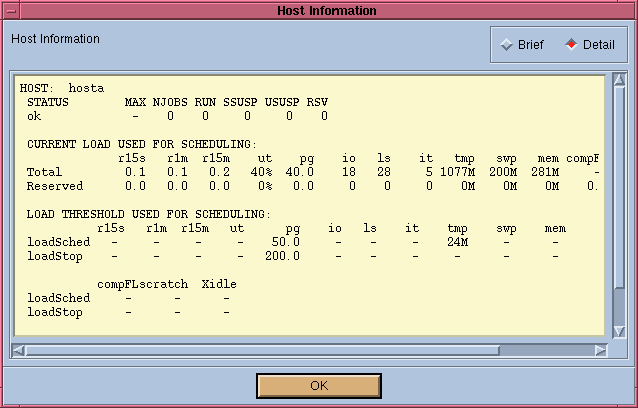
Double-click any host to bring up the detailed host information window shown in Figure 29. This window shows all the configuration information of the host and its current status--such as how many jobs are currently running on the host, and recent load information used for controlling jobs. The "Reserved" line shows the load reserved for jobs that reserved resources. See Section 4, `Resources', beginning on page 45, for more information on resource reservation.
Figure 29. Detailed Host Information
You can also view host information by running the bhosts command from the command line. For detailed host information, run bhosts with option -l.
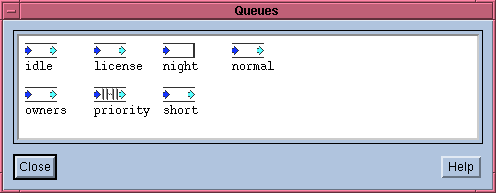
You may also want to know how many jobs are in each queue. To display the queue window shown in Figure 30, choose Tools | Queues in the xlsjs main window. Right-click to customize the view. The status of queues is displayed in the List view, and is indicated by different symbols in the icon view. You can also see if the queue is empty by looking at the queue box.
Double-click a queue to display detailed configuration information for the queue and statistics about jobs currently in the queue, as shown in Figure 31.
Figure 31. Detailed Queue Information Window
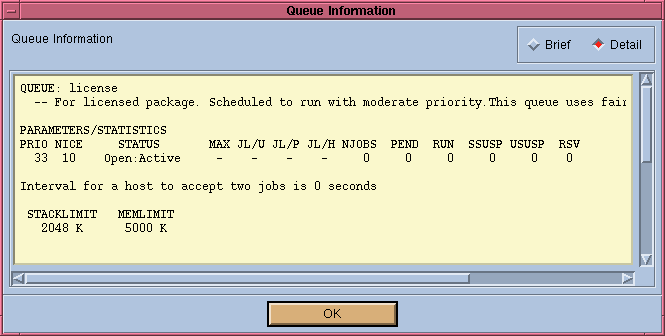
You can also view queue information using command line interface via the bqueues command. For detailed queue information, run bqueues with the -l option.
You may also want to check the load situation to get an understanding of the real-time load situation on each host. The xlsmon GUI gives you the overall load information. Figure 32 shows the main window of the xlsmon GUI which shows an icon for each host in the cluster. Each host is labelled with its status. Hosts change colour as their status changes.
Figure 32. xlsmon GUI Main Window

You can choose other displays by selecting them from the View menu.
To view the detailed load on each machine, choose View | Detailed Load. This brings up a bar chart window as shown in Figure 33, giving load indices for each host.
Figure 33. Detailed Host Load Window
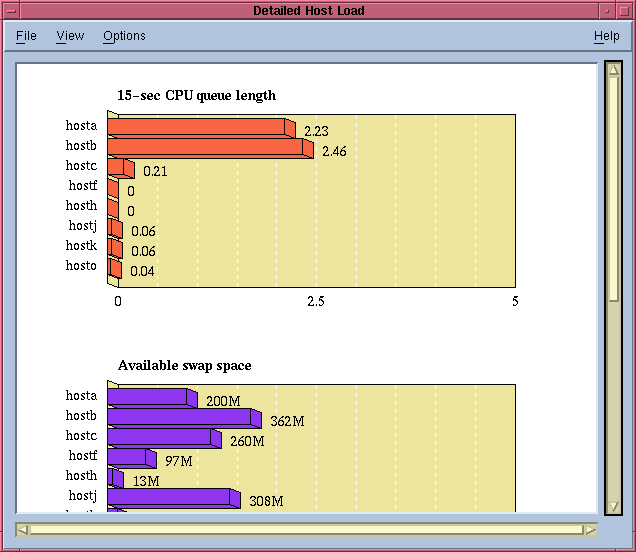
You can select which load indices and which hosts to display by choosing options from the View menu.
The same information can be displayed in text format by running the lsload command, or continuously monitored and displayed by running lsmon command.
You can customize the view of the detailed load window by selecting options from the View menu.
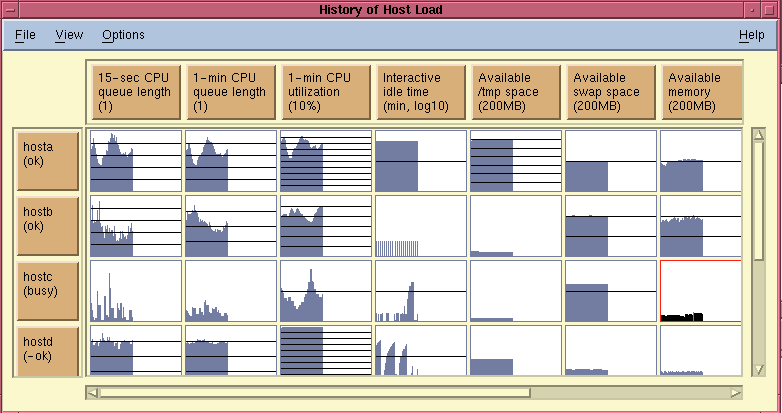
xlsmon also allows you to view host load history over time, as shown in Figure 34. As with the detailed host load window, you can select which hosts and which load indices to display by choosing options from the View menu.
Figure 34. Load History Window
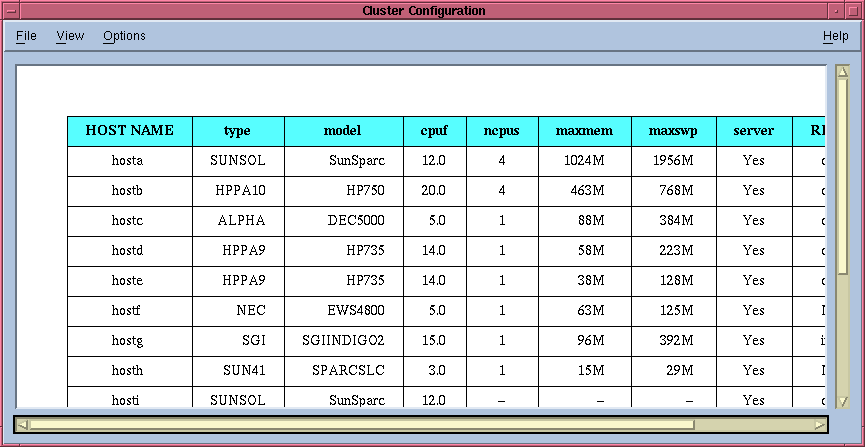
Sometimes you may want to know your cluster configuration information, e.g., number of CPUs available on a machine. xlsmon provides a configuration view that gives you this information, as shown in Figure 35. This window can be accessed by choosing View | Cluster Configuration. This same information can be displayed using the lshosts command.
Figure 35. Configuration Information Window